A common approach would be to transfer values through viewcontroller variables.
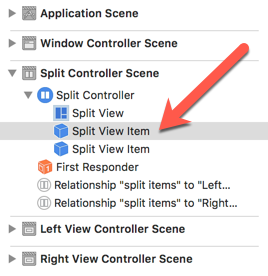
For Mac apps the first steps involve setting up the split view after the usual Mac Cocoa application. In the Main.storyboard add a Vertical Split View Controller. Select and delete the original View Controller.
Control click from the Window Control to the Split View Controller and choose Window content.

I created three new files, two NSViewController for the left and right panes and a NSSplitViewController. In the Main.storyboard assign these class files to reach of the panes and the split view (Identity inspector).
I added a label and button to the left pane and label to the right pane in the Main.storyboard. These were connected as outlets or action in the Left/RightViewController.swift. IBOutlets were connected from each Split View Item to the SplitController.swift class.
SplitController code
import Cocoa

class SplitController: NSSplitViewController
{
    @IBOutlet weak var leftItem: NSSplitViewItem!
    @IBOutlet weak var rightItem: NSSplitViewItem!

    override func viewDidLoad()
    {
        super.viewDidLoad()
        // Join leftVC ro rightVC
        if let leftVC = leftItem.viewController as? LeftViewController
        {
            if let rightVC = rightItem.viewController as? RightViewController
            {
                leftVC.rightVC = rightVC
            }
        }
    }
}
import Cocoa

class LeftViewController: NSViewController
{
    @IBOutlet weak var leftLabel: NSTextField!

    var rightVC: RightViewController? = nil

    var rightString: String = ""

    override func viewDidLoad()
    {
        super.viewDidLoad()
        // Do view setup here.
        leftLabel.stringValue = "Left Label"
    }

    @IBAction func leftButton(_ sender: Any)
    {
        rightVC?.theString = "Now Left!!!"
        rightVC?.updateView()
    }
}
The RightViewController class includes the updateView function which changes the value of the rightLabel string to the value defined in the LeftViewController class.
import Cocoa

class RightViewController: NSViewController
{
    @IBOutlet weak var rightLabel: NSTextField!

    var theString = ""

    override func viewDidLoad()
    {
        super.viewDidLoad()
        // Do view setup here.
        rightLabel.stringValue = "Right Label"
    }

    func updateView()
    {
        rightLabel.stringValue = theString
    }

}
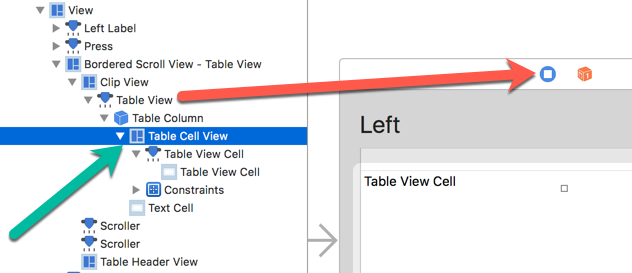
Using a Table View requires some extra code. NSTableViewDataSource, NSTableViewDelegate are added to the class declaration and the tableview functions numberOfRows, tableView and tableViewSelectionDidChange. The last one creates the action to define the string and cause the update when a cell is selected. (The leftButton action is still available).
import Cocoa

class LeftViewController: NSViewController, NSTableViewDataSource, NSTableViewDelegate
{
    @IBOutlet weak var leftLabel: NSTextField!

    var rightVC: RightViewController? = nil

    var rightString: String = ""

    @IBOutlet weak var tableView: NSTableView!

    override func viewDidLoad()
    {
        super.viewDidLoad()
        // Do view setup here.
        leftLabel.stringValue = "Left Label"
    }

    @IBAction func leftButton(_ sender: Any)
    {
        rightVC?.theString = "Now Left!!!"
        rightVC?.updateView()
    }

// MARK: - tableView Functions

    func numberOfRows(in tableView: NSTableView) -> Int
    {
        return 10
    }

    func tableView(_ tableView: NSTableView, viewFor tableColumn: NSTableColumn?, row: Int) -> NSView?
    {
        let cell = tableView.make(withIdentifier: "cell", owner: self) as! NSTableCellView

        for _ in 0...9
        {
            cell.textField?.stringValue = "Cell \(row)"
        }
        return cell
    }

    func tableViewSelectionDidChange(_ notification: Notification)
    {
        if tableView.selectedRow >= 0
        {
            rightVC?.theString = "Selected \(tableView.selectedRow)"
            rightVC?.updateView()
        }
    }
}
class RightViewController: NSViewController
{
    @IBOutlet weak var rightLabel: NSTextField!

    var leftVC: LeftViewController? = nil // leftVC defined here

    var theString = ""
The next step is to add the definition to the SplitController viewDidLoad function
class SplitController: NSSplitViewController
    override func viewDidLoad()
    {
        super.viewDidLoad()
        // Do view setup here.
        if let leftVC = leftItem.viewController as? LeftViewController
        {
            if let rightVC = rightItem.viewController as? RightViewController
            {
                leftVC.rightVC = rightVC
                rightVC.leftVC = leftVC // leftVC declared here
            }
        }
    }
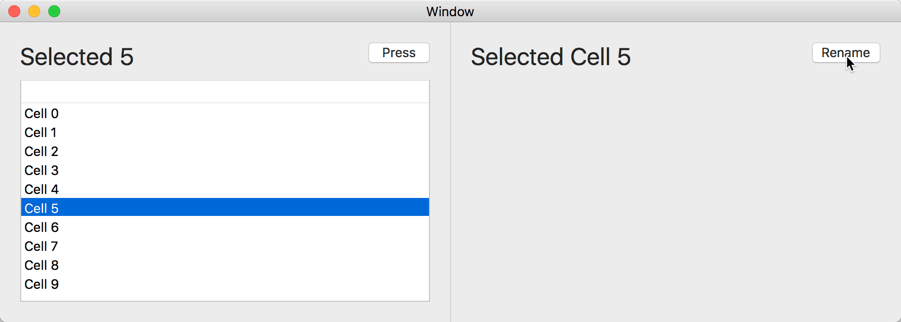
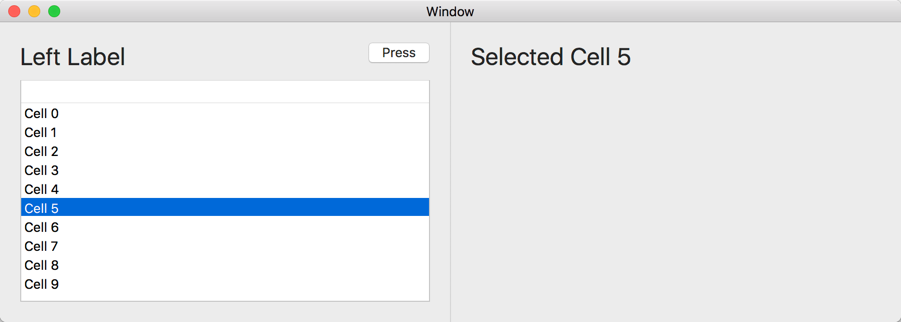
The last step is to define the action for the rightButton
    @IBAction func rightButton(_ sender: Any)
    {
        leftVC?.leftLabel.stringValue = "Selected \(leftVC?.tableView.selectedRow ?? -999)"
    }

    func updateView()
    {
        rightLabel.stringValue = theString
    }
Here we get the value of the selectedRow in the leftView and change the stringValue of the leftLabel.